

Views: 0 Author: Site Editor Publish Time: 2025-09-12 Origin: Site


You want to install a feeding system, but maybe you’re not sure where to start. Whether it’s for animals in a barn or a medical tube at home, you’ll need the right tools and a clear plan. Safety matters every step of the way. Take your time, follow each step, and you’ll find the whole process gets easier.
Tip: Check your equipment before you begin. This helps prevent mistakes and keeps everyone safe.
Get all the tools and materials you need first. This helps you avoid waiting and making mistakes when you install.
Check your site for safety and space. Make sure there are no dangers. Make sure the area fits your feeding system.
Read and follow the manufacturer’s instructions carefully. Go slow to make sure each part is tight and in the right spot.
Test your system well before you use it every day. This lets you find problems early and keeps things safe.
Make a plan to check and clean your system often. Regular care helps your feeding system work well and last longer.
Before you start installing a feeding system, gather all the tools and supplies you need. You want to avoid running around looking for missing parts halfway through the job. Here’s a quick checklist to help you get organized:
For animal or industrial systems:
Feed lines and tubing
Pumps and motors
Feed hoppers or storage bins
Adaptors and connectors
Mounting brackets and screws
Control panels or timers
For medical or home tube feeding:
Tube feeding kits (PEG or G-tube)
Extension sets
Syringes for flushing
Feeding pumps
Securement devices
Cleaning supplies
Tip: Lay out all your tools on a clean surface. Double-check each item before you begin. This step saves you time and helps prevent mistakes.
You can use a simple table to track your supplies:
| Item | Purpose | Ready? |
|---|---|---|
| Feed lines | Transport feed | ✅ |
| Pump | Move feed | ✅ |
| Tube kit | Medical feeding | ✅ |
| Connectors | Join components | ✅ |
You need to look at your site before you install anything. Walk through the area and check for space, power sources, and safety hazards. Make sure the spot matches the needs of your feeding system. Every site is different, so you must adjust your plan to fit your space.
Industry guidelines say you should not rely on a single checklist for site assessment. The Process Safety Site Assessment Program highlights that each site must follow standards that match its own environment. You want to check for things like:
Enough room for equipment and movement
Safe access to power and water
No sharp edges or obstacles
Good ventilation
Clean surfaces
Note: If you see anything that looks unsafe or out of place, fix it before you start. Safety comes first, and a good setup helps your system work better.
When you finish your assessment, you’ll feel confident about moving forward. You know your tools are ready, and your site is safe. Now you’re set for a smooth installation.
Now you are ready to install a feeding system. Start by looking at your layout. For animal or poultry barns, find the best spot for your feed hoppers and pumps. Make sure you can reach everything easily. Use mounting brackets to attach the main units to walls or sturdy frames. Double-check that each bracket sits level. If you work with a medical tube system, set up your feeding pump on a flat surface or hang it on a pole. Keep all parts within arm’s reach.
When you install a feeding system, always follow the manufacturer’s instructions. Each system has its own steps. Some need extra support or special screws. Take your time and check each part as you go. If you rush, you might miss something important. You want every piece to fit tight and secure.
Tip: Snap a photo of your setup before you move on. This helps you remember how everything fits together.
Next, connect the feed lines. For animal systems, run the tubing from the feed hopper to each feeding station. Try to keep the lines straight. Avoid sharp bends or kinks. Use the right connectors to join each section. If you install a feeding system in a barn, make sure the lines reach every pen or cage. Secure the lines with clips or ties so they do not sag.
For medical tube feeding, attach the extension set to the feeding tube. Connect the tube to the pump or syringe. Check that each connection clicks into place. If you install a feeding system at home, label each part. This makes it easy to find and fix problems later.
You want to center the feeder lines so the feed flows smoothly. Look for leaks or loose fittings. If you spot a problem, fix it before you move on. A good setup now saves you trouble later.
Before you use your system, you need to test it. This step keeps everyone safe and helps your system last longer. Here are some best practices to follow when you install a feeding system:
Plan your test. Write down each step and what you expect to see.
Read the instructions again. Follow them closely.
Keep a record of your test results. Write down what works and what does not.
Make sure everyone helping you knows what to do. Training matters.
Use the right tools to check your system. Make sure your test methods work.
Turn on the pump or start the feed flow. Watch for leaks, blockages, or strange noises. For animal systems, check that feed reaches every station. For medical systems, make sure the formula flows at the right speed. If you see a problem, stop and fix it. Do not skip this step.
Note: Testing your system before daily use helps you catch small issues early. This keeps your feeding system safe and reliable.
When you install a feeding system with care, you set yourself up for success. Careful mounting, smart feed line setup, and good testing make a big difference. You can feel confident that your system will work the way you need.
If you need to start feeding through a tube, you will likely hear about feeding tube insertion. Doctors often use a method called PEG tube insertion. PEG stands for percutaneous endoscopic gastrostomy. This means the doctor places a tube directly into your stomach using a camera called an endoscope. You might need a gastrostomy tube if you have trouble swallowing because of a stroke, injury, or illness.
When you get a gastrostomy feeding tube, the doctor can use either the pull or push method. The choice depends on the doctor’s experience. If you have cancer in your throat or neck, the push method is safer. Sometimes, problems like leakage around the tube can happen. If this occurs, the doctor may need to place the tube at a new spot.
Here are some important safety steps for feeding tube insertion:
The doctor will check your health before the procedure.
You will get antibiotics about 30 minutes before the tube goes in. This helps prevent infection.
The team will wash their hands and clean your skin with special soap.
You may use a mouthwash to lower germs in your mouth.
The doctor will use carbon dioxide instead of air to lower the risk of air getting trapped in your belly.
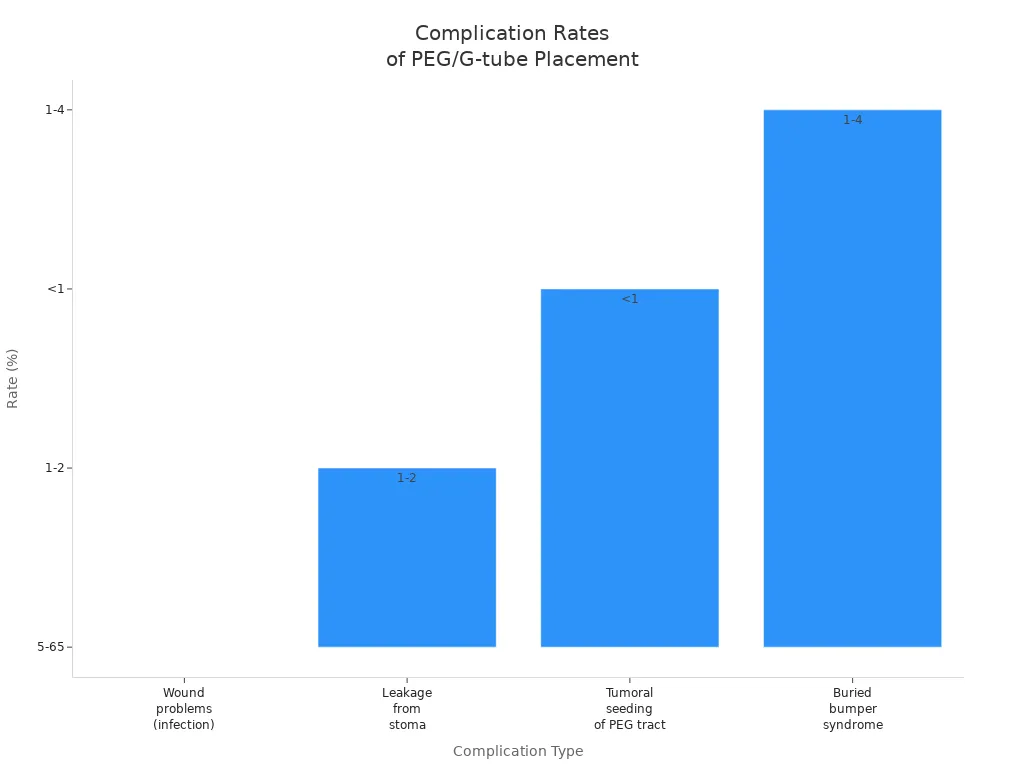
After the procedure, you should watch for problems. Some people get infections or leaks. Others may have pain or the tube might move out of place. Here’s a table showing common issues and how often they happen:
| Complication Type | Rate (%) |
|---|---|
| Wound problems (infection) | 5-65 |
| Leakage from the stoma | 1-2 |
| Tube malfunction | N/A |
| Aspiration of tube feedings/pneumonia | N/A |
| Bleeding from abdominal wall/gastric ulcer | N/A |
| Tube dislodgement/peritonitis | N/A |
| Injury to adjacent organs | N/A |
| Tumoral seeding of PEG tract | <1 |
| Gastrostomy site herniation | N/A |
| Buried bumper syndrome | 1-4 |
You can help prevent these problems by following the care plan your doctor gives you. Always check the tube site for redness, swelling, or leaking. If you see anything unusual, call your healthcare provider right away.
Tip: Doctors recommend changing balloon-type PEG tubes every three to six months. This keeps your tube working well and lowers the risk of problems.
Once your gastrostomy tube is in place, you can start using it for feeding. Many people think they need to wait a whole day before using the tube. New research shows you can often begin feeding through the tube as soon as four hours after placement. Early feeding does not increase the risk of problems and can help you get the nutrition you need sooner.
Before you start, always check that the tube is in the right spot. Your nurse or doctor will show you how to do this. You may need to flush the tube with water to make sure it is open and working. Here’s a simple checklist to follow each time you use your tube:
Wash your hands with soap and water.
Gather your supplies: formula, syringe, water, and a clean cloth.
Check the tube site for redness, swelling, or leaks.
Make sure the tube is not blocked or twisted.
Flush the tube with water before and after feeding.
You will use a feeding set or a syringe to give the formula. Go slowly and watch for any signs of discomfort. If you feel pain or see formula leaking, stop and call your nurse or doctor.
Note: Always follow your care team’s instructions for how much and how often to feed. They will help you set up a schedule that fits your needs.
Taking care of your gastrostomy tube is important. Clean the skin around the tube every day. Dry the area well. If you have a balloon-type tube, remember to check the balloon as your nurse teaches you. Good care for the tube helps prevent infection and keeps you healthy.
If you ever have questions about feeding tube insertion or how to care for your tube, ask your healthcare team. They want to help you feel safe and confident.
Starting your feeding system each day should feel simple. For animal barns, you check the feed hopper, make sure the pump works, and look at the feed lines. If you use a g-tube at home, you gather your supplies, check the g-tube site, and flush the tube with water. Always look for leaks or blockages before you start. If you just had a g-tube placement, you want to be extra careful. You want to make sure the g-tube is secure and ready for nutrition delivery.
For both animal and medical systems, you turn on the pump and watch the first few minutes. If you see feed moving smoothly, you know things are working. If you use a g-tube, you connect the feeding set, check the flow, and make sure the g-tube placement feels comfortable. If you notice pain or swelling, stop and ask for help.
Tip: Always wash your hands before handling a g-tube. Clean hands help prevent infection after g-tube placement.
You need to keep an eye on your system while it runs. For animal systems, you check that every pen gets feed. For a g-tube, you watch for signs of discomfort, leaks, or clogs. If you see feed backing up or the g-tube looks out of place, pause and check the g-tube placement. Sometimes, you need to adjust the pump speed or reposition the g-tube for better nutrition flow.
Here’s a quick table to help you spot common problems and what to do:
| Problem | What to Check | What to Do |
|---|---|---|
| No feed flow | Pump, feed lines, g-tube placement | Clear blockages, check connections |
| Leaks | G-tube site, connectors | Tighten, replace parts |
| Discomfort or pain | G-tube placement, skin | Stop feeding, call for help |
If you use a g-tube, you may need to flush it with water between feedings. This keeps the g-tube clear and helps with nutrition delivery. If you see redness or swelling at the g-tube site, check the g-tube placement and clean the area.
Taking care of your feeding system helps it last longer. For animal systems, you check for wear and tear, adjust misaligned parts, and replace worn pieces. For a g-tube, you clean the tube and the skin around it every day. After g-tube placement, you want to follow your care plan closely.
A good maintenance routine keeps your system running. Here are some best practices:
Check for wear and tear on all parts.
Adjust any misaligned components.
Replace worn parts before they break.
Train everyone who uses the system, especially for g-tube care.
Clean all surfaces and tools after each use.
A well-planned maintenance strategy can make a big difference. Preventive care means you fix small problems before they grow. Predictive care lets you replace parts only when needed. This saves money and keeps your g-tube or animal system working well.
| Maintenance Strategy | Benefits |
|---|---|
| Preventive | Minimizes downtime and keeps your system running smoothly. |
| Corrective | Fixes problems after they happen, but may cause delays. |
| Predictive | Replaces parts just before they fail, saving time and money. |
Note: Always follow cleaning protocols. Wash your hands, use clean tools, and keep the g-tube site dry. Good cleaning helps prevent infection after g-tube placement.
If your pump stops working, try these steps:
Check for blockages in the g-tube or feed lines.
Make sure the system pressure is right.
Look for worn parts or leaks.
Check the g-tube placement if you see problems.
You want your feeding system to deliver nutrition safely every day. With good care, your g-tube will keep working well after g-tube placement. If you have questions about your g-tube, ask your care team. They want to help you get the best nutrition and keep your g-tube in top shape.
You now know how to install and run a feeding system, whether for animals or medical care. Start with good prep, follow each step, and keep safety first. Regular checks and cleaning help your system last longer. If things get tricky, you might need help because:
Automatic systems can get complex.
Planning for cost and structure matters.
Experts boost efficiency and animal care.
Training and teamwork make a big difference. If you ever feel unsure, reach out to a pro or use this guide as your go-to resource.
You should clean your feeding system every day. This keeps germs away and helps your equipment last longer. For animal systems, wipe down surfaces and check for leftover feed. For medical tubes, follow your care team’s cleaning steps.
First, check for clogs or loose connections. Make sure the power is on. If you still have trouble, look at the manual or call for help. Don’t try to fix electrical parts yourself.
Tip: Always keep the manual nearby for quick answers.
Yes, you can use clean tap water for most tube flushes. If your doctor says otherwise, use sterile water. Always wash your hands before you start. This helps prevent infection.
Check for pain, swelling, or leaks around the tube site. If you see anything strange, stop feeding and call your nurse or doctor. You can also gently flush the tube with water to test it.
| Sign to Check | What It Means |
|---|---|
| No pain | Tube is likely OK |
| Swelling | Possible problem |
| Leaks | Call for help |
Stop the system right away. Look for loose connectors or cracks in the tube. Tighten or replace parts as needed. If you can’t fix it, ask for help from a professional.
Leaks can cause infection. Always act fast!


